tie dye techniques tutorial
This tutorial teaches you the. Wear your heart on your sleeve or wherever with this fun kit that turns a.
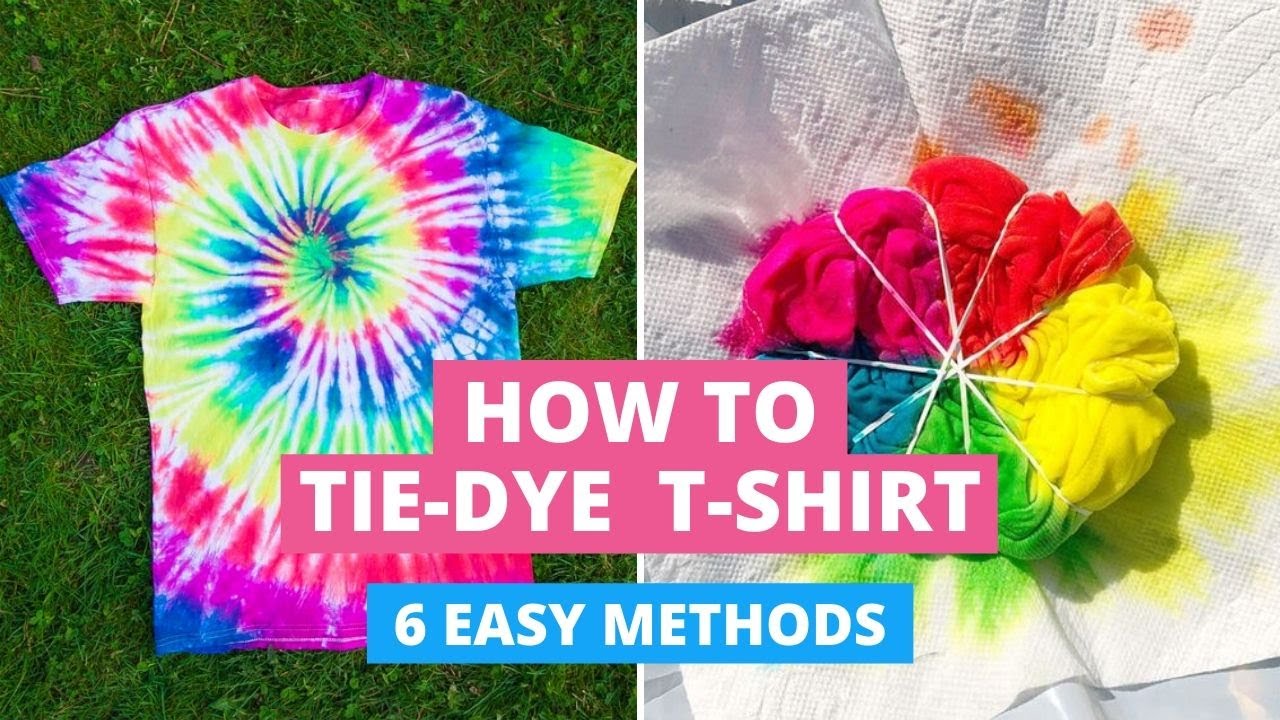
How To Tie Dye T Shirts 6 Easy Methods Diy Youtube
The longer a tie dye project sits the better the dye will seep into the project.

. Grab your tie dye project and put it into your plastic Ziploc bag and let it sit overnight. Using this method of tying youll create a design with your design that corkscrews out from the middle point of your spiralStep 2 Spread your material out on a flat surface. The basic spiral collects all your fabric together into a single coil.
How to tie-dye stripes. How to tie-dye t-shirts - 6 easy methods to try at home. The spiral pattern is a classic tie dye look.
In this tutorial Im going to show you just how easy it is to Tie Dye at home with 4 simple techniques. Ive been doing a lot of research on tie-dye techniques and projects I want to try and I thought Id share some with you. Keep twisting until you have spiralled the whole t.
Tie Dye a Scrunch Design This abstract design is quite a unique one using crinkled folding patterns. I do have two suggestions. Whether you want horizontal vertical or diagonal stripes this technique is quite easy to apply.
Tie and dye as you usually do. Tie-dye techniques for beginners. Red White Tie Dyed Shirt.
How to Use the Crumple Tie-Dye Technique. Bleach Tie Dye aka. This technique is a tried-and-true tie dye method that yields beautiful results.
WithmeLink for my onlin. Tie Dye Your Summer Techniques include step-by-step instructions to help you create various tie-dye looks. Crumple Tie Dye Technique.
I run arts and crafts at a summer camp and before tie-dying them we soak the clothing or whatever in water mixed with soda ash 1 gallon of water per 12 cup of soda ash. Ive done a few Tie Dye Refashions too. Hold on to that small section.
The third step is applying colourful dyes directly to the fabric. First lay the shirt flat. Now pinch the fabric in the middle of the t-shirt between your thumb and fingers and start to twist the fabric round to create a spiral effect.
Spiral or Swirl Tie Dye. This is a very basic tie and dye technique for creating uneven textured patterns on fabric. 17 Tie Dye Patterns and Folding Techniques 1.
Spiral tie dye pattern. Once it is all scrunched bunch it together and add the rubber bands. Beginners guide to tie-dye.
To make horizontal stripes you have to lay the garment out flat on your covered work surface. Read on for our full step by step guide to how to tie dye. Then start from the left sleeve and fold the tie-dye garment in accordion pleat form.
Sit for 12-24 hours if possible. The longer you let it sit the brighter the colors will be. Some of you may remember my faux tie-dye refashion using powdered dye.
Firecracker Tie Dye T-Shirt. You can either do this with dry fabric or with wet fabric that youve wrung out so that its damp but not dripping. How To Get That High End Tie Dye Look.
Start with the shirt laying flat and suse your fingers to start scrunching the fabric starting from the center of the shirt. Check out our step-by-step tutorial that makes it super easy. 11 Beginner Tie Dye Tutorials and Tips Bullseye Tie Dye Technique.
Id love it if you followed me on Pinterest btw. Ice tie dye is super trendy right now. This video shows how to easily create different Shibori dye techniques.
The first step is manipulating the fabric by pleating folding twisting or crumpling it. FREE SHIPPING ON ORDERS OF 35 OR MORE. If youve never heard of it Shibori is a really fun fabric dye technique from Japan.
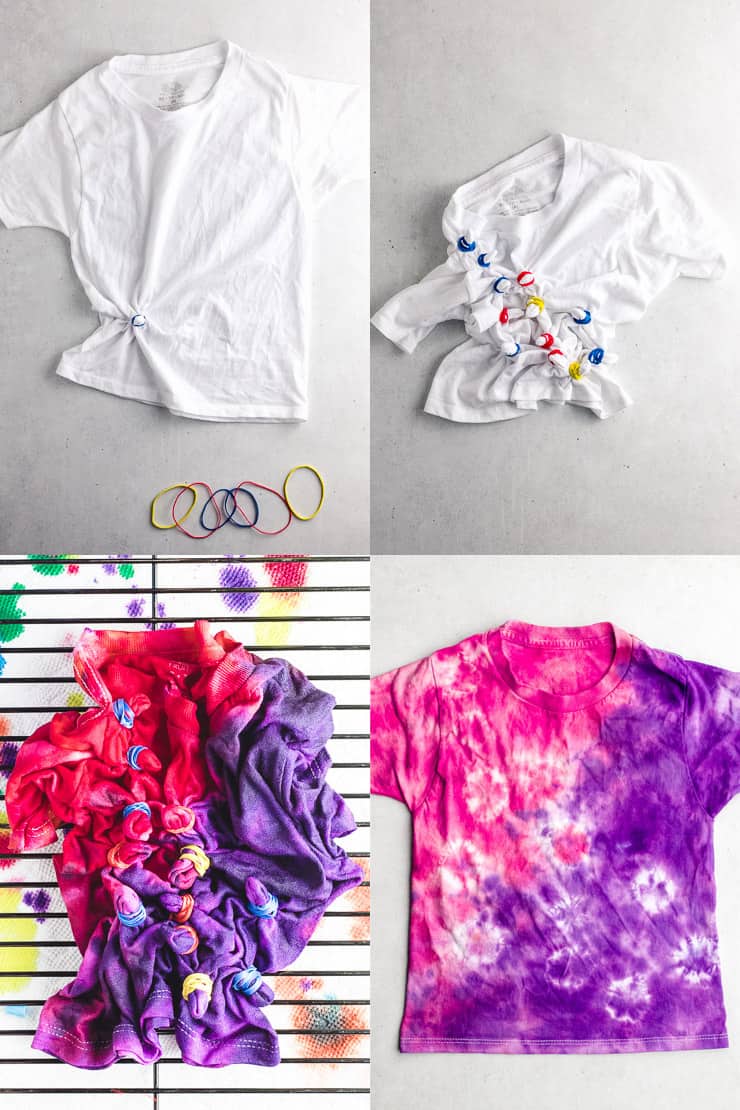
Place project in a plastic bag and leave overnight. This method involves gathering and scrunching the fabric as a tube andor into a small round and tying it using a binding thread. Start by pinching a small section in the center of the shirt.
You could use single. Lay your damp t-shirt flat on the table. Tie-dye techniques are all over Pinterest lately.
Let the Shirt Sit. When the fabric is wet. You can fold the fabric into pleats and then tie and then dye.
Tie Dye Techniques Spiral Tie Dye. If you are using the Tulip One Step Tie-Dye kit all you have to do is add water to each of the bottles. Many tie dye tutorials recommend allowing your project to sit 6 to 8 hours.
And we usually let the shirts etc. The design has light shades of yellow and green in contrast to the bright red. Youll fall in love with simple yet spunky tie dye pattern that will wow everyone who sees it.
Swirl Tie Dye. Step 1 Make a basic spiral. The second step is binding the fabric using rubber bands string can also be used but is much more fiddly.
Spiral is really the most classic tie dye technique of them all. Once the dye is done dripping place the shirt in the bag and let sit for at least 24 hours. Then scrunch smaller sections of the fabric together randomly.
Take your fabric and lie it flat across a surface. The soda ash helps the dye set even more. Scrunch or Crumple Tie Dye.
But before you do make sure the surface is clean. Before placing the shirt into a plastic bag let any remaining dye drip from the rack.
17 Tie Dye Patterns And Folding Techniques Sarah Maker

How To Tie Dye 101

17 Tie Dye Patterns And Folding Techniques Sarah Maker
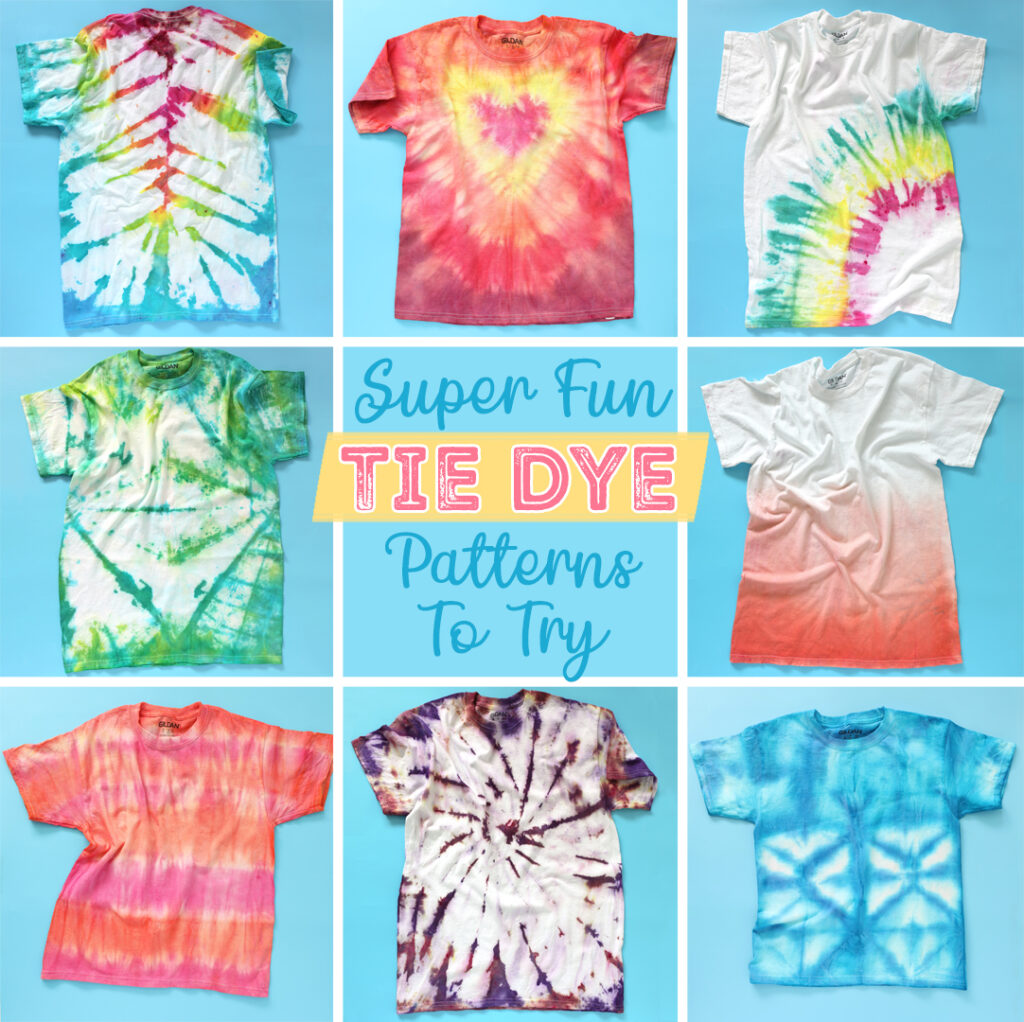
Cool Tie Dye Patterns To Try

How To Tie Dye A Crinkle Or Scrunch Design Full Tutorial 11 Youtube

Tie Dye Instructions Tie Dye Patterns Diy Diy Tie Dye Techniques Diy Tie Dye Shirts
Pin En Batik
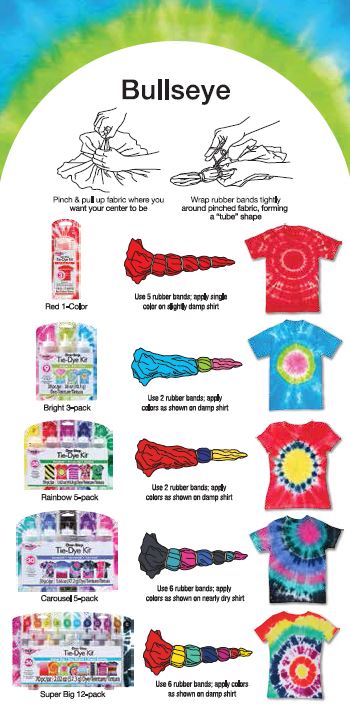
Bullseye Tie Dye Technique From Tulip Favecrafts Com

How To Tie Dye Step By Step Easy Tie Dying For Beginners Treasurie
Comments
Post a Comment